Friday, December 30, 2011

Easy peasy Cinnamon scrolls (yeast free!)

As you might know by reading this blog, I LOVE to cook.  I have no problems making things from scratch, taking the long way round so to speak, but sometimes, when there's an easier and faster way to get things into people's bellies and it works just as well, I don't mind taking that option!

These cinnamon scrolls are a case in point :)  Delicious, buttery goodness that leave the most amazing smell in your kitchen when making.  I was preparing them for Christmas brunch with friends and i wanted to have as many things ready to go straight from fridge to oven to hungry friends bellies in as quick a time as possible.  

When trawling the net, I discovered that the vast majority of the recipes involved yeast. In fact, I had no idea you could really make them without it.  But then I stumbled upon a recipe that used a soda bread/scone type dough, and suddenly my mind was filled with the soft, warm, buttery goodness that i love about scones, in a scroll form filled to the brim with cinnamon sugar and the decision was made!  

I must say, I actually prefer these to the ones using yeast.  They really are something you eat straight out of the oven, just like you would with scones.  The yeast ones are something I would make to eat straight away and then also have leftover to munch on when cold.  But I knew these wouldn't last, if I know myself and my friends! heheheh :D Additionally, unless i've been baking all day, my kitchen is quite cool, so the yeast would have taken a bit longer to rise... and i'm impatient! :D

Photo by a friend Sarah :) taken about 2 seconds before half of these were already down people's gullets :D
Anyway, they were really lovely!  I'll definitely be making this recipe again!! 
Ingredients for 12 mini ones, or 6 larger ones:
For the dough:
2 cups cake "00" flour (plain flour is fine too!) ***
2 1/2 teaspoons baking powder
1/2 teaspoon salt
100g butter, unsalted, chopped
2/3 cup of milk

**If you have self-raising flour, use that, and omit the baking powder, and use only a pinch of salt.

For the filling:
120g butter, softened
4 tablespoons lightly packed soft brown sugar (i used light, but dark would be find too!)
1 heaped teaspoon cinnamon

Preheat oven to 190 degrees 

First, make the filling:
Put all ingredients into a small bowl and beat with a hand held electric mixer until the mixture is light and fluffy :)  Set aside.

Sift flour, baking powder and salt in to a large bowl, then add the chunks of butter, rubbing it into the flour with your fingertips.  Keep doing this until the mixture resembles fine breadcrumbs. 

Make a well in the centre of this mix and add most of the milk (leave a couple of tablespoons).  Mix lightly using a flat bladed knife (i used my cake icing spatula) until it comes together to a soft, light, slightly sticky dough (add the rest of the milk if necessary).

Turn the dough out onto a lightly floured surface and knead lightly and briefly until the dough is smooth.  

Roll out the dough into a rectangle, 25cm wide and as long as it comes (around 40cm in my case).  Roll it to around 1/2 cm thick.  

Using a long flat blade knife (like a cake icing spatula or a butterknife if you don't have), spread the mixture evenly over the dough, making sure you go right up to the edges.  

Roll up the dough (from the long side) to make a long sausage.  Wrap in cling and put it in the fridge to cool for about 20 minutes (this isn't necessary, but it makes cutting easier and more even).  You can also store it like this for up to a few days, ready to be whipped out, baked and served!

Take out of the fridge, and slice the sausage into 2-3cm slices (or simply slice into 6 equal slices for 6 larger ones). 

Place on a baking sheet lined with baking paper, cut side up.  Leave some space for them to spread and rise, they grow quite considerably in the oven!

Bake for 12-15 minutes (a little longer for the large ones) until they have risen well and are lightly golden.

If you want, you can also make an icing glaze, but to be honest, when just out of the oven, there is really no need! 

For a cinnamon icing glaze, mix 1 cup of sifted icing sugar, 1 scant teaspoon of cinnamon and 1 tablespoon of boiling water until smooth.  Drizzle this over the scrolls with a teaspoon.  

Unlike the yeast ones, I don't think these would be great the next day.   But seriously, the are so morish that this won't be an issue.

ENJOY! :D

Tuesday, December 13, 2011

Garlic mushrooms

This is a very simple dish.  This is the side that matches so many things, as well as being a meal on its own when served on some lovely buttered sourdough toast.  I use these mushrooms with breakfast, as a filling for omelettes, I serve them as a side to meat/veg dishes, use it as a base to make a mushroom pasta sauce.  It's my "standard" mushroom dish, and I'm surprised I haven't posted it before!  I cook all mushrooms like this at some point.
You can make it with any mushrooms, but normally I just use regular white mushrooms (either in button or cap form).  Today, I made them with chestnut mushrooms, which are meatier and stronger than regular cap mushrooms.  Regardless of the type of mushroom, choose the heaviest, firmest ones you can find.  If they feel light as air and spongy, they aren't fresh.

I usually just wipe mushrooms with a kitchen towel to remove any dirt.  I don't wash unless i'm preparing for a pregnant lady like my lovely sis.

Garlic sautéed mushrooms

Mushrooms (around 400 grams) sliced into .5cm slices
butter
olive oil
A few cloves of garlic
freshly ground pepper
salt

Prepare all the ingredients before starting to cook :) Super Mario mushroom joins his friends :P
Heat  some butter and olive oil in a frypan or wok until the butter is melted and has started bubbling.  Grind plenty of pepper into the oil.

Add mushrooms and toss them in the butter.  Keep stir-frying on a pretty high heat.  Continue until the mushrooms are all squeaking and sizzling, add the garlic, and keep stir-frying until there's a little bit of water coming out of the mushrooms.  Add some salt to pan, this will draw out the moisture.

If you are making pasta, this is the time to add the cream or wine or whatever you want to add to it to make it all lovely and saucy (see a recipe for gnocchi with mushrooms cooked in this way here)

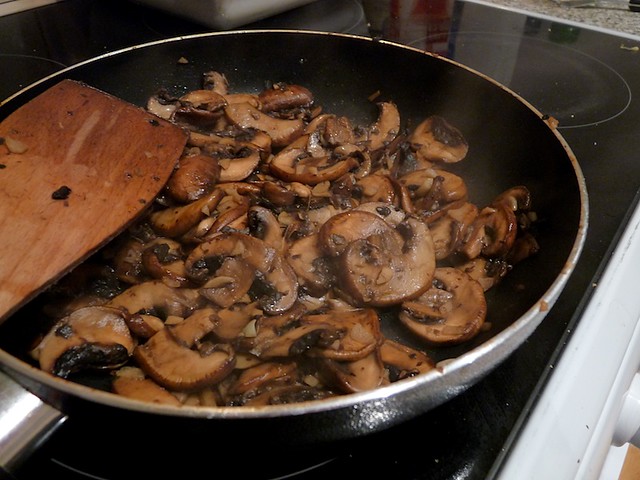
To have them as a side dish, just keep stir-frying until the water has mostly evaporated, taste and season if necessary, and serve piping hot :)
aaand they're done!
Also lovely with a squeeze of lemon, and/or chopped herbs, or add a tiny amount of white wine (make sure it evaporates mostly!) when you add the salt for a lovely tang :)

Enjoy!

Roast Chicken with sage/onion stuffing

I love a roast chicken! :)  It's pretty easy to make, and makes the house smell so delicious :)  Ate a lovely roast chicken made by my brother in law, who adds plenty of good butter, and lovingly bastes it with juices all throughout the cooking time. Thought I'd try and recreate the juiciness in my own roast chicken, and it was a success!

I also found sage, so thought i'd try making my own stuffing.  Not a fan of meat in stuffing, but thought a sage/onion/breadcrumb stuffing without adding the bacon/pork meat would be nice :) I'd never tried this, but would like to think that it'll absorb all the inner chicken juices, and keep everything nice and moist while adding the lovely flavour of sage to the chicken :)

Here goes:

One free range chicken (i got a 1.6kg one, make sure you keep a note of how much it weighs for cooking time!)
2 large onions
garlic, chopped
a bunch of sage, chopped finely
butter (i used salted President butter)
a couple of slices of white bread (stale or dried in the oven then whizzed into crumbs)
salt and pepper
1 free range egg
optional: a teaspoon of mustard (i used English), a couple of teaspoons of redcurrant jam
a dash of white wine

Preheat the oven to 180C and place the top rack right in the middle of the oven.  you can use the bottom rack right at the bottom to make veggies (or simply chuck them in the roasting pan with the chicken if you want)

To make the stuffing:
Dice one of the onions, and fry gently with the garlic in some butter until golden.  Once ready, add to a medium size mixing bowl.  Add sage, breadcrumbs, salt, pepper, mustard and jam (if using), mix well, then add egg and mix again.

Chicken roasting:
Slice the other onion thinly, and place on the bottom of the dish you'll be using to roast the chicken.
Loosen the skin on the breast of the chicken, enough to be able to put your hand in.  place thin slices of butter in between the skin and the breast.  This will make for lovely moist white meat if cooked well (and by well i don't mean over done, but just the right time).
Stuff the chicken cavity with the mixture (don't over stuff, if theres any stuffing leftover, shape into balls and place them alongside the chicken, and place breast up into the dish. brush lightly with oil.
add a tiny dash of white wine to the dish.
Chuck in oven.
Cook for 20 minutes per 500 grams, plus 20 minutes.
It's important to baste the chicken every now and then.  Makes all the difference !
Every 20 minutes or so, baste the chicken by spooning the juices over it.

Once you think it's done, prick into the thickest part of the thigh, if the juices run clear, it's cooked.  If not, pop into the oven for another 10 minutes and try again.

Once it's done, take it out of the oven,  cover loosely with foil and rest for about 20-30 minutes.  You could ignore this step, and eat it right away, but apart from burning your tongue and finding it hard to carve, the meat will be dryer and less tender.  It really does make a huge difference, resting allows the meat to reabsorb juices into the centre, and relax. 

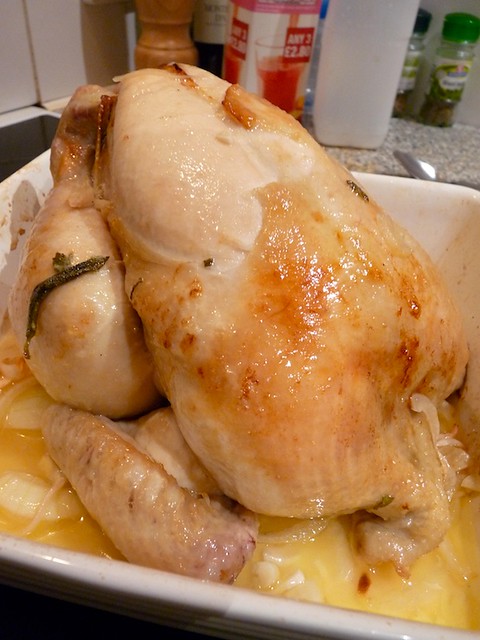
Mobile phone photo, the only one that got all the roast and stuffing :)


enjoy!!

Roast butternut and potatoes

This is a perfect side dish for roast meats.  also a perfect weekday dinner if you just add some other veggies into the mix :)

I've discovered that the smaller the butter nut, the better it is for roasting.  It keeps its shape, and is lovely and soft, sweet and nutty on the inside.  The larger it is, the stringier it gets (so I would keep the larger ones for soups).  Also, I always like to make a little extra, to use in salads or just to nibble on the next day, or if there's lots, it's great to make roast pumpkin soup!.  so delicious!


Honey Roasted Pumpkin soup with Indian Spices

So a lovely friend of mine works as a flight attendant, meaning she's a super jet-setter. She gets to go to all these interesting places for a few days :)  Last time she flew to Mumbai, and asked if i wanted some nice fresh Indian spices.  Sure enough, I was excited to get a couple of spices, but not as excited as I was when i actually saw what she brought, which was a whole bag of stuff!!!

Now that the weather has cooled enough for me to handle being in the kitchen, I decided that it was butter-nut pumpkin soup time!  The reason i use butter-nut is because frankly, i prefer it.  It's easier to cut, it keeps its shape when roasting, melts smoothly into soups without going stringy, and the taste - so sweet, nutty, delicious!

1 medium butternut (i would say about 1-1.5kg) peeled, seeded, chopped into smallish cubes (1.5-2cm)
1 large onion, diced
1 carrot, diced
one potato, peeled, diced. 
If in malta, some "karfus" (aka Maltese celery). If overseas, a celery stem, chopped finely.
some chicken stock (probably about a litre?) (Use veg stock if you please, and to make this dish completely vegetarian)
Goda Masala (or some curry powder, or some cumin, or whatever spice mix you would like to use.  I normally use just cumin, but this time, i decided on the Goda Masala, having never used it, but it said it goes really well with veggie curries, in fact, specifically, pumpkin curry!) More info below
Turmeric
Honey
Salt, pepper.
Vegetable oil
Fresh cream (or coconut cream if you want it to be vegan!), to serve

Spread chopped pumpkin in a baking dish, toss with oil, drizzle some honey, salt and pepper and cover tightly with foil.  Place in hot oven until the pumpkin is cooked (about 30 minutes).  Remove foil, toss a little, and return to oven to get some nice burnt bits going.  Burnt bits = more caramelly nutty flavour in soup :)

In the meantime, place onion, carrot and celery into pot with a little oil, and sweat for a few minutes (sautee with lid on).  Add spices (i used about 2 teaspoons goda masala, and about a teaspoon of turmeric), stir in chopped potato, add some stock - not too much, 2 or 3 cups should be fine, simmer until potato is cooked and kitchen is smelling of spicy goodness.

Once the pumpkin is done, throw it in the pot, simmer for 5 minutes and turn off the heat.  Let cool a little before blending.**

Blend until completely, velvety smooth.  Add cream to taste, and season if necessary.  Stir around with the ladle until the cream is completely blended in. 

Serve with an extra dollop of cream, and some freshly chopped spring onions/chives if you have any at hand. 

I like to serve this into a giant mug,  sipping and spooning it into my mouth, while siting by the heater  watching Christmas cooking shows :)

**I have learned the hard way why soups that require blending always have the "allow to cool a little" thing  before blending the hard way.  when blending, it releases lots of steam.  in a blender, this means a little explosion of burning hot liquid from the top.  In the pot, this means that IF some splashes on you, you be BURNED! ehe. 

Goda Masala is a dark powder spice mix - it's got a smoky and sweet aroma, and makes things spicy without being hot.  I've never seen it anywhere before, so i have no idea if you can get it.  I would try Indian foodshops if you have access to them.  More info here: http://madteaparty.wordpress.com/2007/06/15/goda-masala/.
However, the actual spices in this soup isn't the important thing, as long as you have something on hand.  I've made it with just a bit of curry powder, or even just cumin and turmeric, with some freshly grated ginger added in.