Showing posts with label fun. Show all posts

Thursday, February 2, 2012

Qaqocc Mimli (Stuffed steamed Globe Artichokes)

The start of the Artichoke season to me means a few things (apart form deliciousness!)

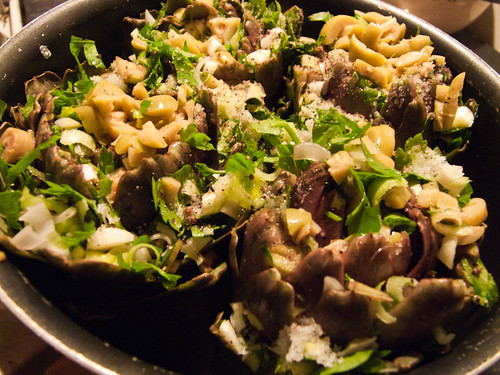
Ready stuffed and packed tightly into the pan for cooking

1) The start of the really cold part of winter
2) Those brilliantly sunny but crisp cold days of January (hiking!)
3) The urge to squirrel away these delicacies to bring them out at the height of summer.
4) The excitement I feel when the farmers leave a field of them to flower so that they can use the seeds for next year.  Anyone lucky enough to have seen these fields, they are simply spectacular. The flower grows to be the side of your head, and when they are in bloom, you really see the fact that they are, in fact, a thistle!

What we call the "choke" in an artichoke is in fact the hairy mass of immature petals that would otherwise bloom to become that purple mass in a mature flower.  In culinary terms, the globe artichoke is the bud, which is edible just as it's been formed, and before it starts opening up to bloom.

Here in Malta, they are a seasonal delicacy, even though you can prepare them (and I will let you know how in a later post!) to freeze and store for later on in the year.  Currently, the price is still "high" as it's right at the start of the season, but in a few weeks, we'll be buying a box load for summer use :)

The preparation of artichokes starts from the selection;
They need to be as tightly closed as possible (especially the inner leaves). 
Firm to the touch and feel heavy. 
They need to be as round as possible, not tapering to a point at the top. 
Ideally, choose them from a Green grocer who keeps them on the full stalk, and only ask him to trim it down to 10cm if you are using them on the day. 
If you plan to use them the day after, keep them on the stalk as long as possible, and you can even do as I do and chuck em in a vase as a decoration until you need to use them (keep them only a couple of days though)

This recipe is based on the typical Maltese way of stuffing artichokes.  There are many variations, and this is most certainly not completely traditional.  I made do with the breadcrumbs, mostly because i didn't have any bread in the house, however they do keep the stuffing lovely and absorb much of the delicious, delicious liquid.  if you choose to add them, just crumble up some day old Maltese bread (or a good firm sour dough if unavailable), and soak with a splash of vinegar (the vinegar i added to the recipe anyway and mixed with the other ingredients.  Then add the rest of the stuffing ingredients to that. 

The method below is actually completely vegan (as long as you don't serve it with tuna hahah)  Bonus!

Many other Maltese recipes call for Tuna.  I like to serve my tuna on the side.  But really, the tuna is lovely when added to the filling too.  next time i'm making these, i'll chop a few anchovies into the stuffing.  I think it will be delicious!

Monday, October 31, 2011

Chocolate Guinness Cake

If you want a dark, moist chocolate cake, this is the one for you.  I was looking for a dark chocolate cake for Halloween - we had red velvet cakes, and I was thinking about making black velvet but a friend noticed this recipe in the Hummingbird Bakery Cake Days book, and since I happened to have a can of Guinness, it was the perfect time to try!

The recipe is for a single cake, however I've found that Hummingbird bakery cakes always work out well as cupcakes too! 
  • Some notes about this cake mix:  It will be MUCH runnier than many cake mixes. 
  • At first, it smells kinda beery.  Then once it's all mixed in together, life is good :) 
  • Before I took it out, i touched it lightly and the cake sprung back anyway, however please note that even though it did this, it still didn't actually look cooked.  This is fine.
  • This particular time,  I used regular butter-cream as I was making millions of little cupcakes, however I believe it would probably taste even better with the cream cheese frosting
  • I made regular cupcakes, mini muffin, and also mini cupcake size.  I adjusted the cooking time by sight, I figured about 10 minutes for the tiny ones, 12-14 for the medium size.  If you are making a whole cake, it should take about 45 minutes, until the top is springy (bounces back when touched lightly) and a skewer comes out clean when put through the middle of the cake.
Ingredients
(for 24 large cupcakes, approx 40 fairy cakes, about 50-60 mini cupcakes)
For the cake/s
250ml Guinness
250g unsalted butter
80g good quality cocoa powder
400g caster sugar
2 eggs (at room temperature)
1 tsp vanilla extract
140ml buttermilk (if you can't find buttermilk, use runny plain unsweetened yoghurt)
280g cake ("OO") flour, sifted
2 tsp bicarbonate of soda
½ tsp baking powder
For the frosting
50g unsalted butter, softened
300g  icing sugar
125g full fat Philadelphia cheese
Cocoa powder, for dusting (optional)

Method
Preheat the oven to 170°C, then line 2 x 12 muffin pan thingie with muffin liners (fairy cake liners are too small) 
Sift the flour, baking powder and bicarb together into a large bowl. 
Pour the Guinness into a small saucepan, add the butter and gently heat until it has melted. Remove the pan from the heat and stir the cocoa powder and sugar into the warm liquid. 
Mix together the eggs, vanilla essence and buttermilk by hand in a jug or bowl, and then add this to the mixture in the pan.
Add the liquids to the bowl containing the flour, and whisk on a low speed until incorporated, making sure you scrape down the sides and get it all well mixed.
Spoon the batter into the cake liners until 2/3 full.  If there is any extra, put it to the side, you can cook it in another batch after the first batch is done.  
Bake for approximately 15-18 minutes or until the sponge bounces back when lightly pressed.
Leave cool in the tin for about 5-10 minutes, then remove them from pan and cook on a wire rack.  
Make sure the cakes are completely cold before frosting. 

To make frosting: 
Sift the icing sugar into a bowl (the bowl of free standing mixer if you're using). 
Chop the butter into small cubes, and if it's not soft, put in the microwave in 5 second intervals until it's soft and pliable. 

Work the butter into the icing sugar with the back of a spoon.  This is my method of preventing the whole kitchen becoming a cloud of icing sugar, as whilst it does smell quite nice, it's also horrible and messy.  

Once you've worked the butter in, using the electric whisk (or freestanding mixer with paddle attachment) mix the butter and icing sugar together until there are no large lumps of butter and it is fully combined with the sugar in a sandy mixture.   You can choose to cover your freestanding mixer with a clean teatowel at this point, to make sure the clouds of icing sugar don't puff out. but if you've worked in the butter, this shouldn't happen.  Having the butter at room temperature REALLY helps for this!

Add the cream cheese and mix in a low speed (I "pulse" it in until it's combined then increase the speed to medium and beat until the frosting is light and fluffy.  Be careful not to overbeat the cream cheese frosting, as it can go from voluminous and fluffy to runny in a surprisingly short amount of time.  You can beat the hell out of it for a couple of minutes though!  it DOES need to be nice and fluffy!
Place the cooled cake on to a plate or cake card and top generously with the cream cheese frosting. The cake can be decorated with a light dusting of cocoa powder.

As I used buttercream, I piped the frosting on.  The frosting above should just be spread on using a palette knife :)